How to Take a Screenshot of PDF
Mar 02, 2021We should clear what a PDF file is first. If you are part of any company or a small business you are most likely familiar with how PDF files look and that they cannot be edited easily. You can think of the PDF files as electronic photos of a printed document. They are meant to keep their formatting no matter the printer machine used to reproduce the document on paper or the software used for the printing process.
Many companies and businesses work with various machines, software solutions and it is sometimes difficult to keep the original format and structure of documents. If you have ever dealt with communicating documents between colleagues that use various software solutions you are likely to have noticed that Microsoft Word documents are not always the best medium for text. Also, documents often include photos and diagrams that have to be reproduced and presented in an orderly and proper manner.
This is where PDF files come in and we should talk about the advantage of making screenshots of content in a PDF file. PDF files can retain their structure very well across different software used to load them as well as across screen types and sizes. PDFs are amazing at keeping digital images embedded in text as well. You will want to take screenshots of content in a PDF file if you need to compile a report or send a quick message to a colleague in relation to a shared project instead of sending the PDF file with a note attached.
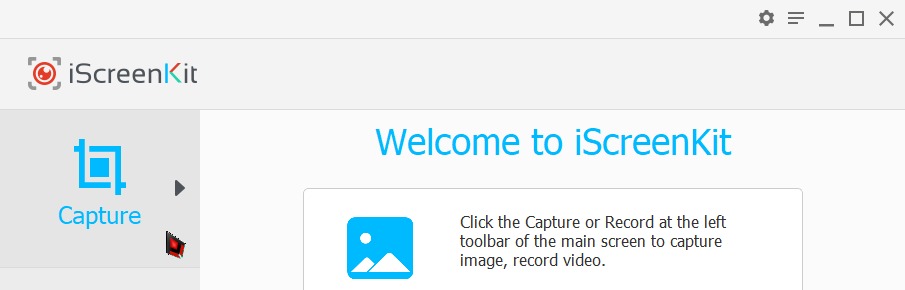
The advantage of screenshotting a PDF file is that the resulting image file is small and carries the author’s point across very well in different contexts. You can use various tools to make screenshots on Windows and Mac. Computer users that are part of a big team and there is more than one operating system involved might need a program for screenshots that works well on PC and Mac. One such tool is iScreenKit that maintains the same interface across operating systems for ease of use. iScreenKit can help users record important segments of PDF files, important diagrams and key text for easy team collaboration. The main window of iScreenKit includes a convenient button called “Capture”:
You have to keep the PDF file open in the background and then click “Capture” at which point the program will darken some areas on your screen and highlight the area around your mouse pointer. You then have to select the program window you want to screenshot and perform a single click on it to make a screenshot. Alternatively, you can hold the left mouse button and form a rectangular area over the content inside the PDF on your screen that you wish to capture. The default settings for the program will ensure that your screenshot will be saved to: C:/Users/username/Documents/iScreenKit
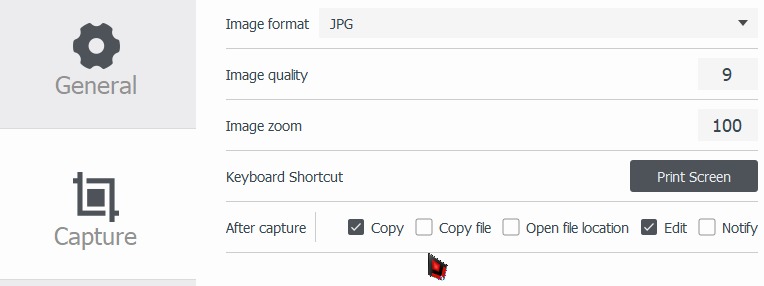
Of course you can change the default location for your screenshots; you can change the format for the grabbed image from JPG to PNG if you like; you can also make the program copy the screenshot in the system memory so you can quickly paste the image in any messaging program that lets you send images through a chat box. iScreenKit allows for a custom keyboard command to be set for the screen grab and that way you can make sure it is not interfering with other apps on your system.
If you open PDF files in your Web browser and you would like to make screenshots there you should know that the developers behind iScreenKit have published a browser extension for Google Chrome that can be found at:
https://chrome.google.com/webstore/detail/iscreenkit/pomfbhbndpdbljcgannnaigbhbabnigk
The iScreenKit browser extension is a bit limited in functionality compared to the main program, but that is so it can be light on resources and not slow down your Web browsing. The extension can be used to make screenshots of PDFs in your browser as well as videos on YouTube and text online. Once you add the app to your browser, clicking its icon will show the following small window:
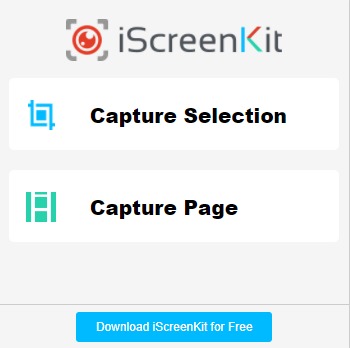
You can either capture a select region of the page you are on or record the entire page. Either way, a new browser tab will open afterward and you can download the screen capture by clicking the “Download Image” button or by right-clicking on the image preview and choosing “Save image as” from the menu in Google Chrome. That is all you need to know if you like to give iScreenKit a try.