Print Screen Not Working? Here's How to Fix it
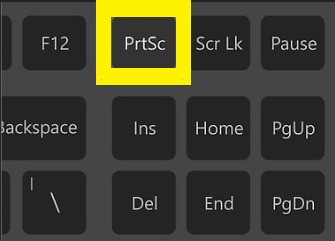
Dec 27, 2020Computer users that are used to making screenshots and either for work purposes or sharing triumphant moments from their gaming might rely on the “Print Screen” button to work consistently. Unfortunately that is not always the case. The “Print Screen” button dates as far back as the MS-DOS operating system where it was used to grab a snapshot of the displayed text. Of course now it serves a slightly altered function. The button has retained its position on the majority of keyboard models and you are likely to find it next to the “Insert”, “Backspace” and “F12” keys as shown below:
The “Print Screen” button has been known to appear under various abbreviations like: Print Scrn, Prnt Scrn, Prt Scrn, Prt Scn, Prt Scr, Prt Sc or Pr Sc. The key is usually set up to launch the built-in screenshot tool on most systems powered by Windows and Linux, Mac OS is a bit different. Whenever you press the key your computer makes a full screenshot of the desktop and saves the content to an image file that is usually in PNG format. If you find out that the “Print Screen” button is not working all of a sudden, there may be a few reasons.
Common Reasons Why the “Print Screen” Button Is Not Working
Problem: Windows installed an update that broke the functionality — yes, I know it sounds far-fetched, but if you follow the updates associated with the Windows Update Cycle you will be amazed how many things are broken with new Windows updates and subsequently repaired with another update.
Fix: Try and install the driver for your keyboard again which usually solves the problem for most people. To do that, open the start menu, search for the Device Manager and find the expandable menu for “Keyboards”. Once you do that, right-click on your device name and select “Update Driver” and then select “Search automatically for updated driver software”, as a last step you should reboot the PC and see if it is working.
Problem: Another app may have hijacked the “Print Screen” functionality.
Fix: check your recently installed apps and see if they are not set up to control how the “Print Screen” button behaves. You may have installed a browser extension or a gaming app that might have changed your settings so that the “Print Screen” button no longer saves your screenshots to the Documents folder.
Alternative fix: use a third-party screenshot tool that can accept a custom keyboard command for making screenshots. I recommend that you check out Lightscreen, Lightshot or iScreenKit. The last one — iScreenKit — even comes with screen recording and webcam recording. I would advise you to install a custom screenshot tool so you can edit the screenshots and take advantage of quick keyboard commands.
Problem: Bad USB connection with the computer.
Fix: You can check for potential USB connection issues by unplugging your keyboard and reconnecting it into another USB slot. That might fix the badly behaving “Print Screen” button.
Problem: The button is not aligned properly — if you cleaned your keyboard recently or you dropped it there is a small chance that the “Print Screen” button is not correctly aligned and is not making good contact with the circuit board in your keyboard.
Fix: remove the keycap with an appropriate instrument like the one shown here and then make sure to firmly put back the keycap in place. If you washed your keyboard please remember to dry the device for a long period so you eliminate the risk of potential damages!
If You Are Sporting a Laptop Device or an Apple-Powered Product, You Might Need to Go to a Computer Technician.
The laptop manufacturers have been trying for a long time to minimize the keyboard so they can save space and allow for a bigger battery, better cooling or better memory storage in an already very small device. You can try the fixes listed above, but you might need to go to a computer technician since opening up the keyboard on a laptop or cleaning it with a wet cloth is generally ill-advised.
Computer users running Mac OS might not be able to reinstall the driver for their keyboard since Apple is known to prevent attempts at self-repair. In addition, you may void any warranties if you try to clean your keyboard on your own. If you are already paying for Apple Care, just take your device to the nearest authorized Apple Repair Center and let them take a look at your device.
If you have tried everything listed, we recommend that you find a good computer technician in your area and give the keyboard for a full diagnostic and repair. You should clean your peripheral devices (monitor, keyboard, mouse, gamepad, speakers, printer, etc.) regularly and put your cables in order. If you are not sure what is the safest way to clean your peripherals, open YouTube and find the best video for you.