How to Take Screenshots on GNOME
Sep 01, 2020If you might be using Ubuntu Mate or another Debian-based operating system it is likely that you are using the popular GNOME desktop environment. GNOME is the default desktop interface for Fedora, Debian and Ubuntu. Comes pre-installed with many apps that offer everyday tools for computer users. The Gnome desktop comes equipped with LibreOffice, Firefox, Evince PDF viewer, Evolution email client, GIMP image editor, Handbrake torrent client, Inkscape (alternative to Paint on Windows), Gnome Maps, Gnome Weather, and Gnome Calendar.
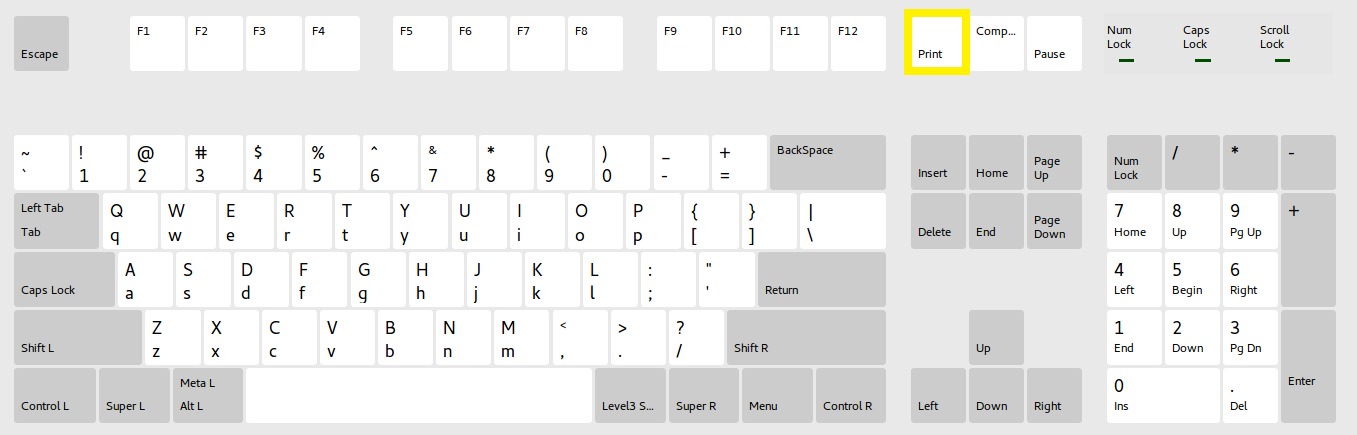
GNOME is perfect for home PCs and light office work with very good support for multimedia. If you are engaged in work that involves text, presentations, spreadsheets, and databases you are likely to enjoy GNOME and you should have a good screenshot utility at hand. Linux offers great screenshot tools and the “PrntScr” button on most keyboards is supported of course. You can find the “PrntScr” button on standard US-based keyboard layouts in the top right corner near the F12, Home and backspace buttons. Marked in yellow below:
Some laptop keyboards may have the “PrntScr” button combined with another to save space. There is no universal way to engage the “PrntScr” button on laptops. If the button is not on its own that is because the laptop manufactures can’t agree on a standard keyboard layout. If you can’t find the “PrntScr” key, you will have to check your laptop manufacturer’s help page or the manual that came with your device.
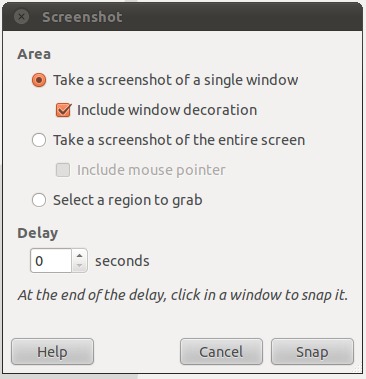
The “PrntScr” key has a short title that stands for “Print Screen” if you were wondering. To no one’s surprise, the “PrntScr” button performs a simple service — allows you to take a photo of what is on your screen at any given time and export the image to a folder on your PC. The “PrntScr” key on GNOME is usually reserved for the GNOME Screenshot tool. Linux is loved for its straightforward approach to tasks and lack of bloat which can be detrimental regardless of your favorite OS. The GNOME Screenshot app has everything you need to take a good screenshot and its options are nicely ordered within a small program window that you can see below:

The GNOME Screenshot app can be launched by opening the Activities menu (alternative to the start menu on Windows) > Accessories > Take screenshot. You can use the GNOME Screenshot app to record an area on your screen, a program window or the entire screen if you like. You can include or remove the mouse pointer by using the options shown on the image above. It is possible to add an artistic effect if you want to add flavour to your screenshot, but I recommend you keep them as clean as possible.
It is beneficial to familiarize yourself with the keyboard commands for GNOME so you can make quick screenshots without having to open the GNOME Screenshot app first. Here is list of the quick commands you will want to learn:
1) Tapping the “PrintScreen” button — captures the entire desktop and makes a file on your memory drive.
2) Pressing the “PrintScreen” button and the “Alt” button captures the Active Window and leaves an image file on your PC.
3) Pressing the “PrintScreen” button and “Shift” at the same time and the mouse left button on your mouse allows you to mark an area on your screen that is grabbed and scaved to an image file on your computer.
4) Any of the above commands plus “Ctrl” makes the app copy the recorded area to your clipboard without saving the image to a file. You can paste the image to a text processor, presentation, a spreadsheet and an image editor if necessary. Just don’t copy anything before pasting the screenshot from your clipboard or you will lose the image.
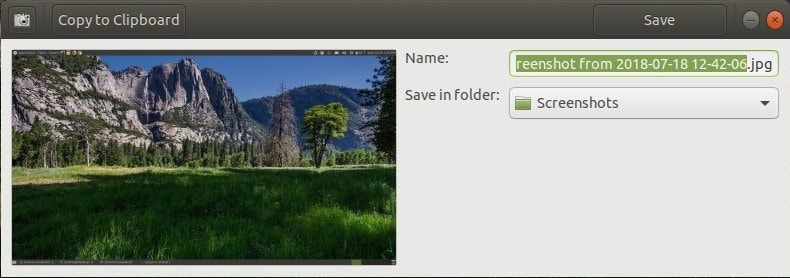
If you want to change the folder where the screenshots are saved, you will need to open the app, take a screenshot and click on the drop-down menu next to the “Save in Folder” option. An example window can be seen below:
The GNOME desktop comes equipped with another program with screenshot capabilities by default. If you are interested in photo/image editing, you might be familiar with GIMP (GNU Image Manipulation Program). The software enables photographers and artists to make digital art, modify photos and make screenshots. You can do a screenshot by opening “File > Create > Screenshot” which will open the following dialog window:
As you might notice, the screenshot tool in GIMP is not too different from the one in GNOME Screenshot. However, GIMP will let you do a lot more with the produced image. The resulting screenshot can be tailored how you want — you can touch up on the saturation, sharpness, add text, add symbols and add graphics of all sorts.
To update GIMP and the GNOME Screenshot app along with every other software on your system open a terminal window from the Activities Menu and select Terminal. Alternatively, hit the “Windows Key + T” on your keyboard and the terminal window will be brought to the screen foreground.
Enter “sudo apt-get update” and hit enter to run a full software update on your system.
You can also type and run “sudo apt-get upgrade” to install the updates to your OS if you like.
If you need to reboot the system check for any prompts and hit “Y” if necessary or initiate a reboot from the terminal by typing and running the command “sudo reboot”.
If the GNOME Screenshot tool is not very feature-rich for you, please check the applications mentioned below:
 Shutter is a great tool that lets you add text and highlights to your screenshots before you share them. It can be installed via Terminal command: sudo apt-get install shutter
 Kazam is a screenshot and screen recording software that is loved by many on Linux. Enter the following commands one after another in Terminal:
sudo add-apt-repository ppa:kazam-team/unstable-series
sudo apt-get update
sudo apt-get install kazam
 Flameshot is very good at placing amazing editing tools at your fingertips right after you make a screenshot and you are likely to love it. Install Flameshot via Terminal by entering this: sudo apt install flameshot
Hopefully this article was helpful in discovering the best way to do a screenshot in GNOME desktop and you should keep exploring apps on Linux. GNOME is one of many desktop interfaces that brings a lot to the table and many believe that the best way to enjoy Linux is to keep exploring and testing new software which, more than often, is free to use and amazing.